Showing posts with label stencil. Show all posts

Wednesday, 10 July 2019

WOYWW

 Hello peeps, if you saw my "desk" last week then you would have seen my bolt cutters!  
Caro asked to see my finished shelves under my decking and my journal-so here they are!

The very old metal frame was an old greenhouse staging from my childhood (so a good 40 odd years old). I cut the galvanised steel to fit so I can use it for storage.  As it sits under my decking/balcony it gets really wet (watering the plants etc above) the old fencing wood I used finally gave up the ghost so I am hoping the mesh will last until the fame finally rusts through.


My 365 Journal for July has been finished too, not particularly well decorated but just a few strawberries and paint flicks


Now my actual desk has an upcycled  stamp block.  A few years ago I unmounted all my stamps (and i have a LOT) and kept the wooden block because they are nice and thick and smooth and they seemed too good to let go.

So I decided to use one of the largest ones to make a sign for my allotment.


I stenciled Plot 12 and stamped a basil plant, garlic and bumble bee.  When they had dried I added colour with a mixture of sharpie pens, inktense pencils and posca pens.


I then need to apply a couple of coats of yacht varnish and drill it onto a post on the allotment.  So, what's on your workdesk today?

Kyla
ps - sorry just realised i forgot to include my "Man Bites Dog" cards this week-will try to remember for next week

Sunday, 15 October 2017

Spray can stencils


So, new stash from the states means I need time to play!  
With this in mind I have been playing with my new stencils.

I thought I would try them on carboard and also watercolour paper.  
Both quite thick substrates so can take a lot of paint and water before  they buckle or start to dissolve.  I added some roughly applied gesso to the cardboard to help the colour 'take' and also flicked watered down gesso across the finished pieces and some water so they have a nice mottled finish.


As is often the way these pieces will probably be abandoned somewhere over the next couple of weeks for some unsuspecting passer by to chance upon.

Happy crafting
Kyla

Monday, 2 October 2017

Abandoned art

 I often leave small pieces I have created on my walks etc for others to find.
A few weeks ago I started to paint some left over cardboard I had and also some small canvasses and I don't think I have shared them with you yet.


For the canvass boards I used stencils and various 3D mediums from gels and pastes (again, using up old stash).  I added colour with sprays and paints, watering down some and flicking them across the canvasses and then adding some words with a posca pen (I love these pens as they seem to take on most surfaces).  I finished them with a light spray of a sealant just in case it rained when I abandoned them.


The cardboard was even easier I just drew direct onto the white acrylic again with a posca pen.  I drew a couple of my favourite Studio Ghibli charachers of Totorro and a soot sprite!
Once again I applied a light coat of sealant.

Some of these have already been abandoned, some I have yet to set free!

Kyla

Sunday, 17 January 2016

365 Challenge Year 4

I often beat myself up for not sticking to things but one thing I have stuck to is Kate Crane's 365 Journal Challenge.  Every day you jot something down about the day, or even a small drawing to represent the day.  It only takes one minute which I think is why it works.

I have been doing this for four years now!  I know!!! Get me, actually sticking to something.

January's page is coloured with Dylusion sprays (I still love these products, such bright colours and water reactive) and the fir trees are made from a stencil I made by punching trees from some waste card and inking through.

I added some snowflakes, stickles glitter and flicked some white watered down acrylic paint across the pages.  The 'January' is die cut from an old cereal box, coloured and stickled so it screams bling and sparkle! 

The pages are filled in up to date, but I tend to take a photo before I start filling them in...lets be honest the daily humdrum life is of little interest to me let alone you!

If you have made any new years resolutions (mine are the usual, work less, create more, be kind to myself etc) then I hope you have made a good start to 2016.

Happy crafting,
Kyla

Friday, 21 August 2015

Multi layered scraps

Thought I would post one of my latest cards I made.
The background is an old 12x12 patterned scrapbook sheet I no longer like that I gesso'd, painted, wiped back, stencilled, stamped and collaged!


I then added an off-cut from an Angelina fibre die cut butterfly that I made for a previous card and attached it with coloured mini staples.

I added a butterfly with some foil adhered for a little bling and stamped a sentiment on the bottom left.

I got suitably inky and covered in paint so I was a happy bunny!

Happy crafting
Kyla
 

Sunday, 16 August 2015

Free Art Friday Find

Many of you will not have been able to miss the fact that I like street art (a massive previous posting on here about Upfest in Bristol) is one clue.  I have also on posted on Facebook many times about various street art pieces I spy on my travels, including taking part in Free Art Friday in Swindon (but never brave enough to take part in the Bristol one!).

Free Art Friday is all over the globe basically people make free art and leave it out around towns for people to find!  How cool is that?

Well, last weekend I was lucky enough to find my first ever piece!  I liked it on Facebook and thought nothing more of it, until I happened to walk past the street on a walk around town and there is was!!


I couldn't believe my luck that is was still there!

So thank you "DaveTheAgent" for creating it.  It is currently on the wall in my craft room, which ironically has blue walls so fits in perfectly!

Kyla
 

Saturday, 6 June 2015

New stash with a local vibe

 Hi, just a quick update of 3 lovely craft items I picked up locally.

The fancy fibres was from http://www.thread58.com/ and I thought the green and heather colours would be perfect for a moorland scene. They are currently based in Old Market but is due to move to Fishponds where she will be able to hold courses too. They have lovely fabric and some amazing African fabric and vintage lace.

The stencil (A4 size) has a lovely typeface and at £2.99 I really could not resist! This is from http://craftandmore.flavors.me/#facebook which is a 3 storey (yep, you read that right) craft shop in the centre of Bristol!  Not much in the way of stamping but some great paints for street art, mixed media, jewellery, general art stash, floristry and wedding favours.

 Finally in the middle is a roll of washi tape. Which I bought in a pop up shop in the Harbour that was advertising our European Green City 2015 status.

This one is Bristol based and features the clifton suspension bridge and of course hot air balloons, two items synonymous with Bristol.

I wasn't expecting to buy anything as I have my eye on some paints but these 3 things were screaming my name so loudly people were starting to stare (and they were all from local shops so it would be rude not to).

Happy crafting

Kyla

Sunday, 1 February 2015

February 365

Hello peeps, well this is a first for me-I have actually made my February 365 Calendar Challenge page ready for the start of the month!!

This months is  a little different for me as I played with scraping gesso over the finished pages to mute the colours.

I also used some sequin waste to ink through and bottle tops dipped in paint to add some rings and splattered some paint across the pages too.  Once again the letters are die cut from my good old cereal boxes, Dorset cereal has a smooth white inside to their boxes, perfect for colouring!

So there you have it, a colourful page-because lets face it the weather is blooming awful at the moment so anything a bit more cheerful is a good thing in my book!

Happy crafting

Kyla
 

Saturday, 19 July 2014

She sells sea shells

Hello peeps....I hope you have been having a lovely weekend so far?  
I must admit I have decided to stay in this weekend as the weather has been odd to say the least!  It's lovely and hot but we have had lightening storms for the last 3 nights and the last one started at midnight and was still going on at 2pm this afternoon!!!  14 hours later!!  They have given out another with hail and wind as well as the lightening to hit in a few hours!!  This time I will have my camera handy!

The positive side is that between the storms we have been having some lovely warm weather.  Shame that I sit in an office with no external windows near me but at least all the washing has been drying quickly!!

In honour of the lovely weather I thought I would do a beach inspired card.

I stenciled wild honey DI through sequin waste, added the sea shell stamp (a freebie from the cover of a magazine a while ago) and masked the shell a few times and added them to some angelina fibres that I ironed on.  I attached the whole thing with a couple of brads and mounted it on some blue patterned paper which I also added some machine stitching to.

A summery card, just wish I lived near the beach!

I hope you have been able to enjoy the nice weather and happy crafting

Kyla
 

Thursday, 2 May 2013

Some new mail art

Hello peeps.  Just a quick update.  
So as you may know I have been dabbling with 'mail art' and sending naked art through our great british postal system!!

This is the latest one I have made and posted to a friend of mine.

I used my homemade stencil of a girl with dylusion inks, some texture paste and posca pens....hopefully the recipient has already seen this!!

Happy crafting

Kyla
 

Wednesday, 23 January 2013

WOYWW, a tikki and a mop up page

Hello everyone, how are you on this cold and snowy (well in the UK at least) WOYWW?

So, on my desk this week is my heat proof mat with some hot glue skull and cross bones and cogs that I have made ready to decorate my "Truvia" sweetner box (hidden at the back) that was on my desk last week.  The box is drying at the moment (I love multi medium as a glue but it really does take overnight to dry!) so I hope to post the finished box and another tutorial (I really cannot fathom youtube!) on how to make the hot glue embellishments later this week.

My "Man Bites Dog" cards this week are "Romantic suspect slays crazy naked star!"  They really do sound like plots for books sometimes!

I thought I would show you the snowman that my hubby decided to make....
 
Yep, a scary tikki head.  Placed at the end of the garden to spook the neighbours kids!!  I told him it was crafting...but in a manly way!!

The great thing about the snow is that I don't feel gulity about staying in at the weekend, catching up on housework and of course, rewarding myself with some serious craft time.
 
If you saw my stencil tutorial on my last post, I thought I would share with you the 'mop up' page.

This is the page I pressed the leftover of my inky stencils onto.  I really liked the page (I find it difficult to leave white space, I love the effect, but it is something I am really going to concentrate on experimenting with during 2013).  I then did some scribbles in black ink.  It does actually say something meaningful (to me at least) but I have tried to scribble it to disguise the words a little.  For a leftover page I am really pleased with this.

If you would like a legal snoop around desks across the globe you can join in here

Stay safe and warm and happy crafting

Kyla
 

Friday, 18 January 2013

A Dyan and Dina inspired stencil tutorial and journal page

Evening all.  I awoke to snow this morning!  Now I know for some of you that is not unusual, but here in the south west of the UK we don't get that much, and certainly not that fast, 5" in a few hours...its covered up all my weeds and dead plants in the garden and it looks so pretty now!

Have you been watching the CHA 2013 video's on the web?  I know I have.  They are so inspiring and I now have a rather long lust list of Tim Holtz new goodies (his new paints look fabulous) and Dylusions (WHITE spray ink!!  I need it, plus ALL the new colours!!).  

However, after spending SO long clearing out my craft space I vowed that anything coming into the room needed to be productive and get used (that includes me!!  I admit I often sit here, Spotify or BBS6 music playing and before I know it an hour has passed me by!!)  and the fact that January is rather a lean month, so I thought I would use up some more of my stash to see if I could make new stash.

Inspired by both Dina Wakely and Dyan Reavley (they are both so talented) I decided to make a figure mask from some leftover plastic.


I chose a figure from a magazine

I traced it with a permanent marker

and cut it out so I had both a postitive and negative image.  

I inked through the stencil with Dylusion inks and then used black acrylic with gold interference paint to add some depth, using the figure cutout to protect the image.
 

I stamped through with a Dylusions background stamp (I use these all the time they are so versatile) and also stamped it with white stayz on using the stamp without an acrylic block so I could bend the stamp slightly and use part of the image.

I added circles of white paint (using the dylusions ink lid as a stamp).

I love the effect, the stencil is no where  near as good as the dylusions one (in either detail or quality) BUT its a great way for me to see if it is a product I would use in the future before I look to making the investment (which lets face it will probably happen quite soon!!).

That's it for now, I am off for a warming cuppa (or maybe some mulled cider.....much more suitable with the snow outside I think!).

Happy crafting

Kyla


Sunday, 6 January 2013

Stencil tutorial with moths

 Hello, I hope you are having a fabulous weekend.

I thought I would post a tutorial (tried videoing it but after 2 hrs awaiting for youtube to upload only 3% of it I gave up and assumed that I have done it wrong! So am using photos instead).

I had some left over thin plastic sheeting I got from the scrap store (left over recycled industrial waste-no idea what its original purpose was) and decided to have a go at making my own stencils.


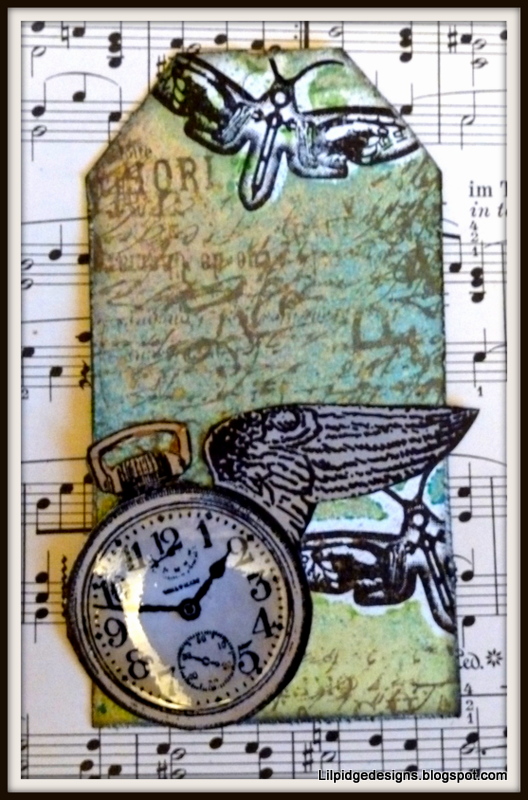
 I cut a few moths (I must admit, I prefer moths to butterflies....much more mysterious) with my big shot  and my paper artsy moth die.


I made sure I had them flying in different directions

 I then used the positive and negatives of the stencils and coloured them with my dylusion sprays and a touch of heirloom gold perfect pearls spray


 I over stamped with my Tim Holtz script stamp and adirondack pesto ink pad


 I peeled the moth stencils off (cleaned them...well, wiped them on the apron...and set them aside so they can be used again) and with archival ink I added the paper artsy moth stamp


 I roughed up the edges with my ever present Tim Holtz scissors


Used the masking technique to add some wings to a clock face

Then attached the clock and added a layer of glossy accents for the glass like finish


I also made an ATC using the left over stenciled paper and my TH ATC die, adding some a typed word, some torn and distressed cardboard from my recycling bin and I cut out one of the moths from my TH paper stash


I admit I am a big fan of stencils and I will definitely have a go at making them again, maybe even a free hand cut one?

If you have a go at making your own, I would love to hear how you got on.

I am entering the ATC into the http://funwithatcs.blogspot.co.at/2013/01/challenge-78-something-new.html

Happy crafting

Kyla