Showing posts with label resin. Show all posts

Monday, 9 July 2018

Wedding Card


Just a quick update for a new card I have.
This is die I borrowed from a friend and I cut lots of black and cream pieces in one sitting to use when inspiration strikes.

The paper is actually a staple of mine, wallpaper.  I find it robust and cuts nicely and of course it is free when you ask for a sample!


I added some ribbon, a resin heart at the top and a glass heart below.

Clean and simple (unusually for me).

Happy crafting
Kyla

Saturday, 19 August 2017

Resin tests

Well I finally found some time to have a play with the resin I bought recently.
I used a variety of molds I already have for resin, hot glue, air drying clay etc.


Now it's the waiting game as I have to wait at least 24 hrs for it to cure before I can remove them from the mold!!  For someone who is quite a quick crafter this is going to be a LONG wait (a reason why I don't use oil paints either!!).

Happy crafting
Kyla


Wednesday, 16 August 2017

WOYWW

Happy hump day peeps!  So once again its time to show our desks in response to the queen of desks, the lovely Julia (link over on the right).

For the first time in many, many months I have new stash to show!

The other week I stumbled across a craft shop closing down (sadly, but I believe the owner is now going to run craft classes so not too bad) and they had some resin kits in red and green.  I have used resin before but not this brand, but as its such a big name I knew it was pukka stuff so took the gamble.  Also they were only £1 each!! I know, they are usually over a tenner each-so I really couldn't pass this by.  It is worth the gamble if they don't mix well or maybe have been open a bit too long.  I am looking forward to having a play.


As to my "Man Bites Dog" cards....well I really wish I video's myself choosing these because they really were randomly chosen AND they came out in that order!!!  The 6th card I chose (I usually choose 6 then use 3-5 to make a phrase) was actually "1st Lady" - you really cannot make this stuff up!!!!

Happy crafting (and I am SO keeping an eye on this weeks news!)

Kyla

Saturday, 16 July 2016

Watching resin dry

Hello peeps.  
I thought I would share one of my latest makes with you.

My Aunt Jackie is visiting from NZ and has always been a HUGE Disney fan.  Over the years she has owned a few Disney watches and the inevitable has happened and they have broken and been replaced (with another Disney watch of course).  

She kindly gave me the broken watches in case I could use the parts in my mixed media (which of course I can-a lovely idea, thanks Jackie).

As a way of saying 'thanks' I decided to set one of the Mickey Mouse figures (the arms are the clock hands) into resin and make a keyring for her.


I am still fairly new to playing with resin but I was pleased how this turned out and as I have given her the gift I can now share it on here!

I now have a couple of watches that I am going to try to take apart (searching the tool box for my glasses screwdriver as I am hoping it will be small enough to try and salvage as many lovely watch cogs as possible).

Happy crafting
Kyla

Wednesday, 18 May 2016

WOYWW

Hump day so that means sharing our desks of shame!!  All thanks to the lovely Julia (and LLJ) full details of this can be found here

On my desk this week is actually some crafting!  I know!!! I am playing with resin again. 
 I cannot  show what as I am hoping it will be for a present.

Some of the resin has been coloured with something I found out a few years ago works well, and that is flocking!  I know, but this is the glitter flocking and it colours resin really well and keeps an even distribution, who'd have a thought it!

My "Man Bites Dog" cards this week are 'Last Romantic Actor Weeps for Dog'-I swear it is almost impossible to get a cheerful headline from this pack!

Happy crafting
Kyla


Wednesday, 13 November 2013

WOYWW

Hello peeps, its hump day...so that can only mean one thing!  Yep, crafters across the globe bare all (well, their workdesks at least!!).

Some are tidy, others not so...mine....well, you can see for yourself-not tidy but not total chaos!


On my desk this week is a card I am making for a friend who has just had a baby boy.

He (the dad not the baby!!) is a massive Dr Who fan so I made a resin tardis and masked off part of the stamped design so the tardis could hang from the line!

My "Man Bites Dog" cards this week spell out "Czar Wanted Thousand (of) Rare Dog(s)"!!!

If you fancy a legal snoop at desks across the globe then pop across to Julias blog here and stare in wonder at some of the gorgeous makes and spankingly clean desks!!!

Happy crafting
kyla


Sunday, 3 November 2013

Buddha card and keyring

 Hello peeps, I hope you all had a good weekend?  Mine was busy, the first time in over a month I managed to get into town...not for long (it got a bit too crowded for my crutches) ...but I managed it!

I thought I would share my latest make, this is a card I made for my mum who has moved into a new house. The tag is coloured with some dyes left over from a fabric dying session back in the summer and the Buddha is made from air drying clay in a mold.  The flower and oriental papers are all out of my scrap box (which seems to be growing again!) and I stamped the background.


I coloured the Buddha with coloured gilding waxes and a thin covering of matt multi medium to seal it.


I also made a matching keyring with the Buddha this time made from friendly plastic and encased in resin which I drilled with a hand drill to make the hole.


A small, but very personal gift.
Right, its Sunday so that can only mean one thing....craft, sofa and maybe a veggie roast!!

Happy Crafting
kyla

ps - Same (Hettiecraft) suggested I join in the Snippets challenge which can be found at http://pixiescraftyworkshop.blogspot.co.uk/ - so I did!!

Friday, 1 November 2013

Resin cufflinks

Hello peeps, just a quick update.  
I have been playing with two part resin again and decided to make some cufflinks.  
A lot of my work blouses use cufflinks but there are very few female ones on the market, and even fewer that don't feature pink!


I backed them with some vintage pages from a book and some watch parts (boy these are hard to take apart...I may have to give in and purchase some already deconstructed watch parts!!).

One of a kind...a bit like me!!!

I hope you all have a lovely weekend

kyla
 

Thursday, 10 October 2013

Creative Chemistry 102

 Hello peeps.

So, after my ankle surgery (which I timed to coincide with Tim Holtz next Creative Chemistry class!!) I have finally managed to do a little crafting (not easy with keeping my ankle above hip height I can tell you....my craft room is now a hotchpotch of stools and cushions which I balance my leg on for about 15 mins at a time before I need to move around a bit....its testing my patience I can tell you!!)-but it is worth it as the course have been fabulous so far.

Now, the course started with Distress paints of which I owe none!  Tim says that its all about understanding the principles with these courses, so I decided to try different acrylic paints on his effects and see if they work.  I tried Anita's, Windsor and Newton and Rowney but the one that worked the best was Eco Green paints.  Now, they are not the same as distress paints so I had to pre mix them down with water, however, now I have learnt the techniques I have the knowledge to try and experiment and hopefully at some point I may get some distress paints.

 This card was made with the tag (I have another which I have printed out the instructions on and added to my Creative Chemistry 101 tags) demonstrating rusted metal. 


 I used the Eco Green paints again mixing the brown top layer in with Bronze Distress Stain and I really like the effect.  I added a metal cog I cut from a metal food tube and coloured with alcohol inks and a cog I made with my ever trusty hot glue gun (I SO love making mould and using hot glue to full them!!) and a rusty washer that I rusted myself with vinegar and cheap cola!!)


The marbled effect didn't really work with any of the acrylics I had (they still produced a nice effect I wouldn't have experimented with unless I was doing this course) but the tag above was the best with the Eco Green paints once again.

Finally I made a metal tag.  Now, once again I didn't have the metal, the embossing folder or the paint.  However, armed with the knowledge from Tim's instruction I decided to have a go using some metal tape from the tool box ( I think its what you bind round pipes?), black gesso and a different embossing folder.  I thought this would make a perfect background for my cyber man topper I made a couple of weeks ago from some resin!

So there you go.  Proof that you don't need to have all the products, but once you have the knowledge you can take it to the next level and start experimenting.  I know I will certainly be playing more with the oxidized metal technique on my first tag as this has lots of potential.

Right, time for my next lot of pain killers and another ice pack around ,my ankle!!  Happy crafting

Kyla


Wednesday, 27 March 2013

WOYWW

 Happy WOYWW...again!!!  Seriously, how come Fridays don't come round this quickly?!

So on my desk this week is my new key storage box, on the left is my latest stamp I have carved (more of that in a few days when i have played with it properly), happy and very dirty fingers and my latest resin creations.


I made these resin letters using a chocolate mold.  Once set I painted them with black acrylic (you can see I don't often use paintbrushes by the state of my fingers!!) and dried it hard with a heat gun so that the paint bubbled and created a bit of texture.  I then added some gilding wax to highlight areas and added some satin varnish (applied yet again with my fingers!!).  I have NO idea what to do with these, I am sure inspiration will strike at some point!!

If you'd like to share your desk, or even have a legal snoop at workdesks across the globe, you can pop over to the lovely Julia's blog here 
Happy Crafting

Kyla

ps - just noticed I missed my 'Man Bites Dog' cards this week!!  First time in I  think nearly a year!  oops!  Next week they will be back (honest!)

Monday, 14 January 2013

Rusting, Resin and friendly plastic...how much CAN I fit on a card!

Hello peeps, how are you keeping?  After over 4 weeks I am finally starting to feel better!  This winters bugs are nasty and so many people have or are suffering.  If you are, I hope you are on the mend.

Have you been watching all the fun of the CHA unfold on the blogs?  I must admit, I have loved every sneak peak and behind the scenes that are being posted (especially Dyan's, Hels and of course the Duke of Distress') and more than once I have almost pressed the "buy now" button on the 24/7 craft shop that is the internet!!  But I am so proud as I didn't (though, not sure how long my restraint will last!).

So, back to crafts....this is the card I made for my Mum's birthday (which was last week so its safe to post it on here now!).

The tag is cut out of patterened paper and put through a script embossing folder and the edges touched with some DI.  I added the picture of the sailboat (its actually a price tag off clothes that my dad saves me 'cos he knows "I like bits and bobs that can be reused!!!")  and added the word "Journey" (as its very pertinent for my mum).  I die cut a bird (also from an upcycled clothes tag) and stamped it with the script outline (from paperartsy).....ooh, it almost looks like I have a plan using 2 lots of script to bring it all together (must admit, more of a happy accident at this stage!).  I added some flower ribbon, a flower and some beads on a wire.

At the top of the card I added a buddha that I made from a mould and some friendly plastic, as my mum is interested in buddhism, some TH film strip (as she is always taking photos) and attached it with my tiny attacher (I am still loving this tool).

In the middle of the flower I added a pink heart that I made from resin and some bells that I rusted.

I stamped a card base with my TH script (ooh..this is really looking like a plan!) to bring it all together and added some buttons and a bit of fern to balance the card.

Right, I am off to scan the virtual world for more CHA fun!!

Happy crafting
Kyla


Monday, 31 December 2012

An UFO to finish the year

 Hello peeps, it's the end of the year and what a year it has been.  

My nephew was christened, my brother got engaged (for those of you who don't know, he lives in Ecuador and met a lovely girl over there, who before moving to Ecuador lived just a couple of miles away from him in London-see the world is small!!), I went to many art exhibitions (including one that had live tattooing....with free cider!), saw a lot of live comedy, went to many vintage fairs, loved every minute of the Olympics and especially the Paralympics, saw lots of live music, a festival and re-embraced my love of outdoor wild swimming (which I grew up doing).  Oh yes, and work full time and lots of craft!!! (phew, reading this back its no wonder I am knackered!).

To end the year I finally finished my MDF banner I have been making.


It is hung above the window in the craft room
 
I added homemade resin pieces (purple jewels, pink roses and a steam punk piece above the letter t).  I dyed plain white lace with distress reinkers (shaded lilac and brushed corduroy), covered the MDF with TH papers and cut the letters out of my TH Sizzix wordplay die (my new Christmas pressie from my hubby......the boy did good!!.....downside is that it doesn't cut all the letters....but he has contacted the supplier and I am sure after the holiday season they will be back in touch and will sort it out).

I hope you all had a fabulous festive season and I look forward to 2013 with anticipation.....

Not sure about new years resolutions....they tend to put pressure on you (and I have enough of that) so maybe work less, craft more? 

Happy crafting

Kyla
 

Friday, 28 December 2012

On your marks, get set......

 Hello peeps....I am finally feeling almost back to normal after being poorly (well, as normal as a I can) and have decided to upload some photo's (couldn't post them before as they were Christmas pressies!).

So, the title of my post.  I seem to have inadvertently set myself 2 challenges over the past few days (because of course, this isn't a busy time of year at all!!) On 23rd December I had the brilliant idea to make my Dad a present....no quick project for me....nope....I decided to make him a scrap book!

One of my Coven secret santa gifts were 3 chipboard scrap books so I used one of those.  I printed out the photos and covered each of the papers with patterned papers, sanding back the edges to distress and soften them.  I then edged them with distress ink and on the front pages I added a couple of Tim Holtz metal corners,


I embellished most of the pages with cogs, ribbon and as my Dad is a keen photographer I included some Tim Holtz mini negative strips.  To add a little aged sparkle (well the photo's were from the suprise 70th party we threw Dad back in November!) I added some blue foil around the edges of the pages, rubbing back to expose the paper underneath in some areas (the blue edges on the picture below).

To decorate the cover I made a blue resin heart.  I coloured the resin by mixing in mica powder, it gives a lovely opaque colour with a fantastic depth of colour.  That is one of the great things about mica, it can be used in so many ways.

I was pleased I made my Dad a handmade gift......but I really do test myself by deciding it less than 48 hrs before it being opened!  

Challenge 2 is  I plan on starting the new year in a different way.....with a tidy craft room!!  To start I have bought 3 large lidded storage containers and am part way through sorting out all my fabric and sewing stash (which is dumped....and I mean dumped) that has been spilling behind my dining room table for more than year now.....I like the have some small triumphs before tackling the craft room....which those of you who follow me on WOYWW know that trying to sort out the craft room is no mean feat.....I am not planning on doing it all (I haven't totally lost my marbles yet!), I thought I would tackle one of the stacking drawer cabinets...they are  a bit of a glory hole so if I can tidy them up and organise them better I am hoping I may be able free up at least 1/2 a drawer for some of my Christmas craft stash!!

Wish me luck with my task....I may be some time!

Happy crafting
Kyla
 

Tuesday, 23 October 2012

A wee man trapped!

Phew, it has been a hectic week.....3 gigs (1 folk, 1 punk and 1 proper old skool rock and roll), waved my brother off to Ecuador for another year and closed down the caravan ready for the winter season!

All in all, very little time to play in the craft room (let alone answer the blogosphere!).

I did however have time to download a few photo's of some of my recent resin makes.


This is a wee man who I trapped in resin.  Now, I have a bit of an odd confession, I quite like taking photo's of railway figures in odd poses....(no...not that odd!) you know, workmen digging with a pic axe on a piece of broccoli, now this little fellow isn't 'doing' anything, so doesn't really fit in with my 'scenes' so I thought I would encase him in resin.  No idea why, more of a case of "I wonder if I can....".
 

I also tried a multiple layered resin piece, this has a layer of resin with watch parts in, allowed to dry overnight then another layer added.

I just need to drill a hole and string them so I have another 2 'different' necklaces!

Right, bath and large glass of red (I know, on a school night!) are beckoning!

Happy Crafting, and to those I owe a response to....promise I will get round to it in the next couple of days!

Kyla
 

Wednesday, 18 January 2012

WOYWW

It's Wednesday again!  I swear the weeks go by quicker as I get older!  Anyhoo, on my workdesk this week is my journal page for January and at the back of my desk are a couple of tags that I made at Coven on Monday evening (a weekly get together with friends for crafting)


I have been playing with my resin again, this time I used a chocolate mould from poundland to create a domed circle pendant which I embedded a New Zealand coin and attached a metal bail on the back to hang it from.
I was pleased with the result, the only issue I have is that I tend to be an impatient crafter so having to do one layer of resin, let it dry for 24 hrs, add the coin and another layer of resin before leaving for another 24 hrs is not something that comes naturally, but I am pleased with the results.


I would also like to say a big Hello to my new follower Sandra.

So, if you fancy a legal snoop around desks from around the globe, feel free to join us by popping over to Julia's blog here

Happy Crafting

Li'l Pidge

Sunday, 1 January 2012

So, who feels like this today?

Happy New Year to one and all, 2011 was a mixed year, lots of crafting and some great Coven trips, some wonderful weddings and the birth of my new nephew.  It was also tinged with some sadness, pain and working TOO many hours....so bring on 2012.....I am ready and waiting!

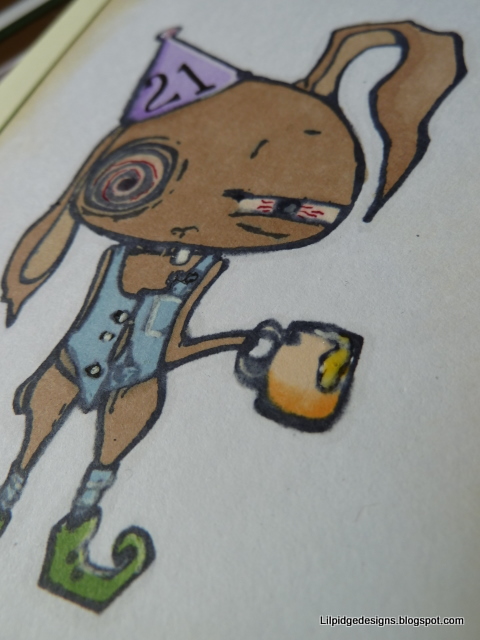
Now, down to business.  This is a card I made for my cousins 21st which was new years eve, I made it with my new octopode stamp I bought from the Artful Splodger when I was at the NEC a few months back (such a nice bunch at the stall....I went back 3 times...mainly to chat, though I did buy a 'few' bits and pieces).

 I coloured the hare in with pro markers, adding a 21 to his hat...

 I added a blood shot eye and a little glossy accents on the beer froth in his glass.......how many of you are feeling like this today?!

This is the Christmas card I made my hubby this year.  I stamped it with a stampotique design onto a vintage book page, adding a grunge party hat, some distress stains smeared around the edges and some sequin waste dabbed with picket fence stain and used this to stamp onto the card, adding a few circles made from a bottle cap dipped in distress stains also
 
 Time off work has allowed me to spend some time crafting (woo-hoo!!) so I played with my new resin kit I got for Christmas. This is totally new to me, so I thought I would have a play and see what I could do.

I started by measuring the resin and hardener (windows open as its hazardous AND with a face mask on....I thought I looked like a doctor or dentist, hubby suggested mad murderer!!)


 I wasn't sure what to use as measuring cups, they need to be small and disposable.....then I found in poundland 40 plastic shot glasses ready for the party season...perfect!
 
 I then set out my moulds (the blue one came with the kit...the black ones were chocolate moulds from poundland) and bits and bobs.

Once poured then the waiting game begins.  Now, I CAN be patient....honest....but waiting overnight for each layer to set is something I will need to work on (or find a work around!!)
 These are my first 2, the one on the left is embedded with angelina fibres and different glitters the one on the right, just glitter.

Then I decided to embed some watch parts in the resin and backed it with a page from a dictionary (the word was 'time' I thought it was appropriate).

 So for a first proper attempt I am really quite pleased, only a few air bubbles (micro ones around the diddy cog)....now I just need an excuse to wear it.


I hope that 2012 is great to you all and that after the 'plink, plink, fizz....' of today that you all have a great new year.

Happy Crafting

Li'l Pidge x