Showing posts with label cogs. Show all posts

Saturday, 16 July 2016

Watching resin dry

Hello peeps.  
I thought I would share one of my latest makes with you.

My Aunt Jackie is visiting from NZ and has always been a HUGE Disney fan.  Over the years she has owned a few Disney watches and the inevitable has happened and they have broken and been replaced (with another Disney watch of course).  

She kindly gave me the broken watches in case I could use the parts in my mixed media (which of course I can-a lovely idea, thanks Jackie).

As a way of saying 'thanks' I decided to set one of the Mickey Mouse figures (the arms are the clock hands) into resin and make a keyring for her.


I am still fairly new to playing with resin but I was pleased how this turned out and as I have given her the gift I can now share it on here!

I now have a couple of watches that I am going to try to take apart (searching the tool box for my glasses screwdriver as I am hoping it will be small enough to try and salvage as many lovely watch cogs as possible).

Happy crafting
Kyla

Saturday, 26 January 2013

Altered and upcycled box tutorial

Hello, everyone.  I do hope you are having a lovely weekend.

If you follow me from WOYWW you may have seen an altered box hiding at the back in various stages of altering.

Well, I finished it and thought I would do a tutorial.  Its a little photo heavy as I still cannot fathom why youtube takes so long to upload (hrs for a 3 minute video!!), but if you'd like to learn how I made some embellishments for pennies then read on.


 I started with an empty box.  It contained a natural sweetener and the box seemed too good to chuck so I thought I would alter it and turn it into a treasure chest.

This is the before


 This is the after.  It cost virtually pennies to make!


I painted the box with acrylics, a mix of brown, black and green.  I then dried it with a heat gun and added some gold, black and green wax to the edges, buffed it up and painted a satin water based acylic varnish over the box to seal it.


To make the embellishments I made some moulds from a metal cog and a skull and cross bones pendant.  

I used a hot glue gun to fill the moulds


 When dry, pop them out of the moulds, there may be some overspill but there is a real easy fix

Tidy up the embellishments with scissors.  I use my Tim Holtz scissors, they have amazing micro serrated blades and this means they are a great work horse.

 When they are all tidied up I covered them in black acrylic dabber and then rubbed gold wax over them and buffed them up.  I sealed them with the same acrylic  sealant and now they are ready to use.

 I glued them to the box with multi medium and added some hinges that I stamped with a paper artsy stamp onto grunge paper and cut out.  I coloured the hinges with copper distress stains and attached them with mini brads


I also made a lock with a paper artsy stamp on grunge paper and added a couple of larger brads at the front which I texturised by walloping with a hammer!!


So there you have it.  A treasure chest ready to fill with whatever you choose.  I was thinking scrunching up some brightly coloured tissue paper inside and filling the box with chocolates!!  

Either way, I think this is a great gift box, a one off and best of all its upcycled and cost pennies...whats not to like?

I'd love to know what you think.

Happy crafting

Kyla

Wednesday, 26 September 2012

WOYWW

 Hello peeps, time for the weekly cry of 'Wednesday? Again?'.

I am feeling slightly smug, as several weeks after cleaning my craft room (or 'the pit' as my hubby called it!) its still tidy(ish). 

The past week I have been reading blogs and searching the net for some new techniques for me to try out with my stash. 

 My thinking is, if I like the technique then when I go to the NEC craft show in November I can buy some more stash in the knowledge that it will be stuff I will use (yeah right, hands up who comes back from a show and uses 100% of the stuff they buy!)....see I am already justifying the spending spree!

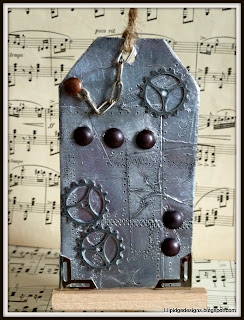
Anyway, part of the technique challenge I have set myself is on the desk (the photo was taken Tuesday).  I tried TH metal patchwork technique, using some old metal flashing tape that I liberated from my father's shed!


I taped it across a blank tag that I cut out of an unwanted manilla folder and made marks with my Ten Second Studio metal tools, I then rubbed black acrylic dabber all over and wiped it back.  I added some metal tacks I bought in the hardware shop (£1 for 50) and cut the backs off with wire snips.  I added some metal corners, metal cogs and finally attached some chain with a brad to finish it off.


For a first attempt I am quite pleased with the effect, and that it is using up old stash that I have (always a bonus).

If you fancy a nose around desks from across the globe the feel free to join in with the queen of WOYWW, Julia, here

I quite like this weeks random 'Man Bites Dog' cards....they really are drawn randomly, sometimes they work, other times not......its just a bit of fun!

If you are in the UK I hope the floods are not having too adverse an effect on you (one months worth of rain overnight!).

Happy crafting

Li'l Pidge