Sunday, 22 May 2016
A mini book make
Wednesday, 16 October 2013
Day 2 and 3 of Creative Chemistry 102
Thursday, 10 October 2013
Creative Chemistry 102
This card was made with the tag (I have another which I have printed out the instructions on and added to my Creative Chemistry 101 tags) demonstrating rusted metal.
I used the Eco Green paints again mixing the brown top layer in with Bronze Distress Stain and I really like the effect. I added a metal cog I cut from a metal food tube and coloured with alcohol inks and a cog I made with my ever trusty hot glue gun (I SO love making mould and using hot glue to full them!!) and a rusty washer that I rusted myself with vinegar and cheap cola!!)
Thursday, 22 November 2012
Vintage Royal Navy inspired card
On a brighter note, it was my dad's 70th birthday at the weekend.
Dad was in the navy and travelled the world, used to collect stamps and more recently has taken up photography.
so I took all these elements and made them into a card for him.
The swallows and anchors represent his navy career, the map background, his travels. I used old stamps and a page from a vintage stamp catalogue which is valetta harbour in Malta (where both my parents were stationed). I then added some TH mini film strip and attached it all with my new tiny attacher I bought at the NEC (I recommend this attacher, I have rheumatoid arthritis so my hands are not too great, but I have no issues using this....basically its great!).
As to the gift....what do you get a 70 yr old who needs nothing? The answer was an MDF (from MDF Man) remote control holder (I swear remote controls breed!) which I covered in pages from a vintage stamp catalogue (the stamp catalogue is a great find, it cost about £2 and has hundreds of thin pages perfect for craft!) and distressed it a bit.
I think he liked them both...they are certainly unique!
Anyway, the rain is lashing outside so time to settle down to some steaming hot veggie chilli and some trashy TV!
Happy crafting
Kyla
Tuesday, 3 April 2012
A quick fabric printing tutorial and a 101 Tag
Anyhoo, I did realise that I haven't shared with you the card I made for my nephew's Christening
The background paper is TH which I distressed, adding some torn and distressed music paper, an inked piece of grungboard flourish and printed a photo onto fabric using freezer paper.
It is not as difficult as I thought:
- cut your fabric and freezer paper to size
- iron the freezer paper, waxy side up, onto the fabric
- run it through your printer.
- To ensure the ink sets I then iron the fabric with a piece of brown paper over the top to heat set
This is a tag I made using a technique from the 101 Creative Chemistry. I covered the tag in distress stains, over stamped with archival ink then splattered water over to distress slightly.
I stamped the bird, colouring with DI, adding a small amount of glossy accents for the eye, cut it out and mounted the bird on the tag. I then added small amounts of gold foil around the edges.
I have a stinking cold and chest infection at the moment, so I am off to try a glass of chilli beer my hubby bought me (meant to help my throat!!) - it has a WHOLE chilli in the bottle......I may regret this.....but you have to try new things right?
Happy Crafting
Li'l Pidge x
Tuesday, 20 March 2012
Woo Hoo....mojo is back!
As I blathered on before, in an effort to not work too late and have some sanity time (that'll be crafting then!) I signed up to Tim Holtz Creative Chemistry class by onelinecardclasses.
Yesterday was Day 1, understanding the differences between dye and pigments etc. Now, I have crafted for more than 30 years (gulp!!) but I tend to learn visually, so some things just don't sink in, let alone stay in the old grey matter (yes, it is probably an age thing also...or maybe too many ciders whilst locked in the craft room?!), however, by george, this seems to have struck a chord!! Bloody marvellous!
So, I experimented last night with various mediums and papers....
For example, this is a pearl acrylic dabber over some rather nasty patterned vellum and overstamped with pitch black acrylic dabber
Now, I cant be the only one who buys multi packs and finds half of the pack is not really their style? This vellum (I am NOT posting a before photo....take it from me...it was nasty!) would have been consigned to a charity bag...but now, its a great background for a new project-genius. I have NO idea why this never occurred to me before-thanks to Mr TH I broke out of my comfort zone.
This one was some sticky backed metal contact paper from the hardware store, I dyed it with alcohol inks, overstamped with stayz on and coloured the bird with acrylic paint-again, I would never think to overstamp acrylic colour card (I applied the paint with my fingers....it gives a lovely flat finish.....and I was lazy and couldn't be bothered to find a brush!!)
Next, Day 2 of the class...understanding distress....
This is the wrinkle free distress (which I have tried before but it never really worked.....NOW I know what I was doing wrong!!)
This is the watercolour technique (didn't have an watercolour paper so have used some heavy card), I quite like this technique, its quick and easy but looks like it took a while (my perfect style!!).
So I have now managed a little sanity time, I cant wait to find out what the next class entails-its all about experimenting and understanding why a product behaves like it does rather than making a set design, card etc...right up my street!
Also, hello to my new follower, my cousins lovely wife, Kristina. She makes some delicious dyed yarns....its a times like this I wish I could knit properly!
Anyway, best go and clear up the mess that is my craft room....(yeah right....off to watch CSI!)
Happy Crafting
Li'l Pidge x
Thursday, 12 January 2012
Use it Up and a crafty top tip!
In an effort to keep to my Use it Up pledge I decided to make a card from only my ever expanding scrap box on my desk-now this isn't that difficult as it does contain a bit of everything!!
The Tim Holtz papers were already cut to size (hurrah), the fabric already stamped and all I needed to do was grunge it up a bit-perfect! How did I not notice these went together and were just sat there (it MAY have had something to do with the fact I couldn't see them for the ton of stash dumped on top!!)?
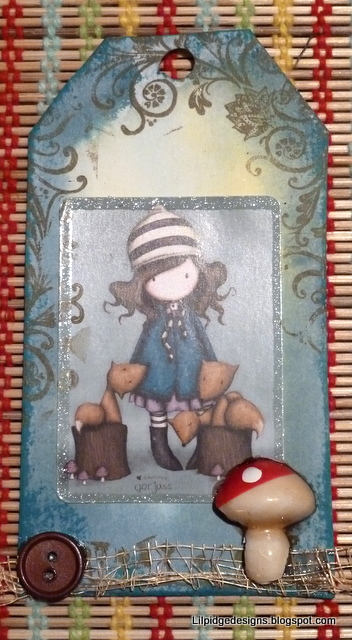
This tag was also made with left over stash (but made at Coven night), the tag coloured with distress stains (I am so frigging loving this product). Tracy brought in some mushrooms-so in an effort to get more with less I decided to cut it in half! Is there anything that Tim Holtz scissors won't cut through?? I have even cut through one of his glazed dolls before with them!!
That's another couple of makes from old stash (the gorguss die cut above I have had for over a year!!).
If you are looking for cheap supplies and are in the UK, then I have a tip for you....poundland!! Yep, forget the craft dept and head for the hardware section. For £1 you get 3, yes 3 rolls of very sticky double sided tape (yards and yards of the stuff for only a quid-bargain!!).
If I come across any other bargains I'll let you know!
Happy Crafting
Li'l Pidge x
Tuesday, 5 April 2011
I then made 2 eggs out of air drying paper clay which I painted and glazed for a high gloss, then made a needle felted nest to home them in! As you'd expect I then assembled the whole lot with my glue gun. I use my glue gun so much its knackered! I 'borrowed' it from my dad and its over 20 years old and now the rubber tip has finally broken off so there is now an exposed metal point-which gets VERY HOT (I am speaking from experience here!!) so I think a trip to Axminster tools is overdue! Tuesday, 1 February 2011
The things I do when I can't sleep!
A great day out, not much buying (I'm saving myself for later in February when I go to the Paper Artsy Tim Holtz event!!-yes you read that right, Tim Holtz-yeah! A whole day dedicated to getting inky and grunging I cant wait) though I did by a handbag! Only I could buy a bag at a craft fair-but the good thing with handbags is that they always fit!!
So, after a lovely day out with the girls I ended up waking on Sunday at 01:30, wide awake, what a mare! And why did I wake? First of all cos I was disappointed that the craft fair had very little in the way of storage, I mean I can't be the only one who'd like storage for 12x12 papers in a DRAWER rather than a box where you cant dump a ton of junk on top of it and STILL get to the papers (if you work for a storage designer, please call me....there are things that NEED to be designed for crafters rather than the quite frankly rubbish storage that seems to be swamping the crafting outlets-I mean WHY do they do such big embellishment boxes? You could store THOUSANDS of ruddy sequins in one of those little boxes and HUNDREDS of buttons, I know I have a lot of stuff, but purlease give me a break and make some boxes designed for hoarding crafters (not sure there is another type of crafter!). So, I decided to tidy the craft room....(when the sun finally decided to grace us with its presence)
and so I started to pull everything out...
and then it spread to the bedroom....then I decided to drive to Tesco's to buy their A4 4 drawer units (£14, with a 3 for 2 offer, 12 drawers for £28 not bad) so that I could organise stuff.....
I stamped the image, colouring with pro markers and adding some shimmer with a sakura pen. I then stamped and distressed around the edge of the image, mirroring the stamped border around a red card base, finishing with a peel-off number 21 and a red and black ribbon that I singed slightly on the edges with the heat gun.Tuesday, 25 January 2011
Playing with Promarkers

Tuesday, 28 September 2010
Lots to Do Challenge - Alter

and turned it into this:

First I sanded the blank rack and applied a layer of white gesso to give an even base. Then I painted it with ranger paint dabbers in lake mist and pearl and distressed the edges with distress inks. Next I stamped some old text, earth post stamp and post marks onto tissue paper with green and black stayz on, adhering them with modge podge. I added a vitage postcard sticker and a postage stamp and gave the whole thing a coat of modge podge.
I then got out the hot glue gun, adding scrabble letter tiles and then a coating of varnish to protect....once its dry it sit proudly by my telephone.
I hope you like it and enjoy checking out the other posts on the LTD challenge site
Happy Crafting
Li'l Pidge x
Saturday, 20 February 2010
Finally a few new makes
So, you must be thinking that I havent been crafting AT ALL! Well, I have, but I havent got my sh*t together to photograph it. So, a big thanks to my dad who took some photos (with his v. posh nikon slr and light room box) so i can finally share my goodies.
This is a hair slide I made. The flower is made from wired ribbon, with small beads in the centre. I have needle felted 2 leaves and on the left, you can just see i hid a bumble bee!
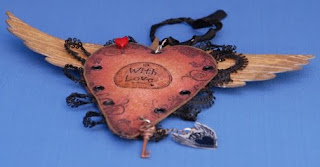
This is my valentines gift I made for my long suffering crafting widow-husband! Its made from grunge paper, which I cut out, distressed with inks, stamped, glittered, punched holes and added eyelets.
I added a hear pin, some black trim and used a glaze to highlight the 'with love' stamp so it was glossy.
I also decorated the back, adding grunge board wings (glittered, then wiped off to distress them), a grunge board crown that i used a gold leaf pen to add a bit of colour and some more black trim.
At the bottom of the heart I added a chain, shrink plastic winged heart and a skull key to finish it off......1,2,3........aaahhhhhh.....
Happy crafting
l'il pidge xx
Tuesday, 19 January 2010
Happy vrafting
Li'l pidge x
Tuesday, 21 April 2009
Crafting, crafting and a gargoyle
So, what's been going on then in the world of Li'l Pidge? Well, I have been stretching my wings and flying south for a bit. I took my new bag that I made with some of the material my friend Jill bought for my birthday on my new machine (which you will be pleased to know is still alive). I made a lining:
and included a small pocket with a little label and a magnetic clasp
I am SO proud!! I have been parading it up and down, and took it around on a quick tour of Devon (where we saw a great gargoyle)
The postie brought my latest ATC swap from the CB Forum (who again published a photo of my tag book on their e-newsletter-gosh! I am so chuffed),
I mounted this on patterned paper then attached stamped acetate and attached with brads to get over the problem of seeing glue/tape through the acetate
Take care peeps, and happy crafting.
Li'l Pidge